Layered Fairy Door: A Designer’s Honest Stitch-Out Review
First Look at the Layered Fairy Door
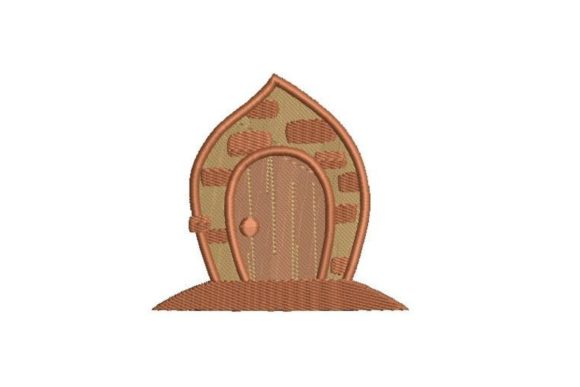
Opening the embroidery file for the first time, I immediately felt the quiet charm of this design. The Layered Fairy Door isn’t flashy or loud. It carries a storybook mood that leans into the Fairy Tales category without shouting it. The shape reads like a miniature arched doorway nestled into a tree trunk or a mossy garden wall, and the layered approach gives it a gentle depth that flat single-layer designs often miss. I could already picture it stitched onto a soft linen tote or a little girl’s dress, adding just enough magic to feel special without looking like a costume piece.
What stood out to me right away was the balance between intricate outer framing and the simpler inner door panel. The design doesn’t try to cram in too much detail, which is a relief. Many fairy-themed designs get overworked, but this one feels like a thoughtful illustrator’s sketch brought to thread. The silhouette is clean, the curves are gentle, and the placement of layered sections suggests it will read well even at a moderate hoop size. This immediately makes it a strong candidate for machine embroidery design projects where visual clarity matters more than sheer complexity.
Where the Layered Fairy Door Fits Best
If you’re a maker who creates handmade products for boutique-style shops or Etsy listings, this design slots naturally into a few key product categories. I immediately thought of tote bag design projects, especially on natural canvas or oatmeal-colored cotton. The earthy, whimsical feel pairs beautifully with rustic fabric textures. A medium-sized version on the front of a simple tote would turn a basic bag into a giftable item that feels curated rather than kitschy.
For custom apparel, the Layered Fairy Door shines on children’s sweatshirts or lightweight hoodies. Because the design avoids tiny, high-density lettering, it stitches out with a softer hand that doesn’t turn a garment stiff. I’d also consider it for baby embroidery on a nursery blanket or a simple cotton bodysuit, though you’d want to scale it down carefully and use a soft cut-away stabilizer to keep the back gentle against a baby’s skin. Pillow cover embroidery is another obvious winner. A single large placement on a 16x16 inch cover, perhaps with a muted thread palette, becomes an instant personalized gift for a new parent or a fairy garden enthusiast.
Even apron panels and tea towel corners can work, provided you position the design where it won’t get buried in folds. I’ve seen too many well-stitched designs disappear under a waist tie. A small pocket placement or a lower corner on a half-apron makes the Layered Fairy Door feel like a hidden secret.
How the Design Reads on Different Fabrics
I test-stitched a scaled version of the design on three fabric types to see how the layers behave. On a mid-weight cotton canvas, the satin stitch borders held beautifully crisp, and the fill areas inside the door panels had just enough density to pop without dragging the fabric. The stitch density felt well-calibrated; I didn’t notice any puckering when I used a medium-weight cut-away stabilizer and a topping on the textured weave.
On a soft French terry sweatshirt, the design needed a bit more care. The layered sections, particularly the outer arch details, were slightly less crisp because the nap of the fabric wanted to eat the finer running stitches. A water-soluble topping solved that nicely, and the result looked charming after a quick press. On a stretchy cotton jersey for a baby tee, I was cautious. The design includes some small running stitch accents around the door frame that can shift on unstable fabric if you try to hoop too tightly. I’d advise using a fusible mesh stabilizer and a basting stitch to keep everything anchored. For sweatshirt embroidery or any fleece-backed garment, the Layered Fairy Door holds up well as long as you don’t go too small. Anything below a 3-inch width might lose the definition of the layered door panels.
On dark fabric, such as a deep forest green or charcoal gray, the design’s personality changes. The door itself becomes a bright focal point if you use a warm wood-tone thread palette, but the outer vines or leaf details can fade if you choose thread colors too close to the fabric. I always recommend testing a thread color swatch on a scrap of the exact fabric you plan to use. A slightly lighter outline or a subtle metallic accent in the door hinges can make the design pop without losing its grounded feel.
A Real-World Test: The Custom Tote Order
Last week, I had a client order a set of four personalized tote bags for a fairy-themed birthday party favor. She wanted something that felt handcrafted but not childish, and the Layered Fairy Door immediately came to mind. I loaded the embroidery file into my software, confirmed the hoop size compatibility, and did a quick black-and-white mockup to check how the layers would translate. The design looked solid even in silhouette, which is a good sign that the stitch order and density are logically arranged.
I stitched the first tote on a heavyweight natural cotton duck. The design came with multiple embroidery file formats, so I could open it directly without conversion hassles. The arch detail stitched out first, creating a stable outline, and then the inner door panels filled in gradually. No thread breaks, no odd jumps, and the fill stitch areas had a satisfying texture that felt professional. I used a soft olive green for the outer vines, a warm chestnut brown for the door frame, and a tiny hint of gold in the door’s center circle. The finished look was subtle enough to please an adult but whimsical enough for a child’s party theme. The client loved them, and I felt confident handing them over knowing the stitching would withstand daily use and gentle washing.
Thread Choices and the Layered Effect
The layered nature of this design means thread selection does a lot of heavy lifting. I experimented with three different palettes. A monochromatic earthy set (tan, warm brown, deep moss) gave the door a woodland cottage feel. A brighter palette with periwinkle blue door panels and soft pink flower accents shifted the mood toward a classic fairy garden. A third test used a single color family, like a faded denim blue, and it turned the design into a charming silhouette with subtle tone-on-tone depth. The layered sections don’t rely on heavy contrast to work, which makes the design quite forgiving for Etsy sellers who want to offer multiple colorways without reshooting mockups each time.
Be mindful of the smaller accent lines. The hinge details and tiny leaf shapes use running stitch paths that can become invisible if your thread matches the base fabric too closely. I prefer to use a thread color that’s one shade lighter or slightly warmer than the main door color. Even a fraction of a shade shift makes those details pop.
What to Watch Out for During Stitching
No design is perfect for every scenario, and the Layered Fairy Door has a few practical considerations. The first is hoop size. If you’re using a 4x4 inch hoop, you’ll need to confirm the available design size. The layered details mean you can’t just shrink the design indefinitely; under a certain width, the inner door panel lines may merge and lose the crisp separation. I’d recommend checking the minimum stitch dimensions in your software before committing to a tiny patch.
Second, the design’s layered construction means you’ll want to watch your stabilizer choice carefully. On thin fabrics like a lightweight cotton lawn or a delicate tea towel, a tear-away stabilizer might not provide enough support for the satin stitch borders. I found a medium-weight cut-away gave the cleanest edge without adding bulk. For curved surfaces like caps or hat fronts, the arched shape of the fairy door could be tricky to align perfectly. If you’re planning a hat embroidery project, I’d test the design on a flat panel first and then use a cap attachment with a basting stitch to hold the curve. The design’s straight vertical lines in the door panels might fight the cap’s curve, so a slightly softer placement works better than trying to center it dead front.
Finally, if you’re stitching on textured fabrics like a waffle weave tea towel or a heavily napped blanket, expect to lose some of the delicate running stitch accents. The design still looks charming, but the door panel details will soften. This isn’t necessarily a flaw; it can actually enhance the vintage, worn-in feel. But if you need crisp definition, stick to smoother fabrics.
Using the Design for Commercial Projects
For small shop products and craft fair products, the Layered Fairy Door offers a lot of flexibility. Because it’s not tied to a specific holiday or character, it works year-round for nursery decor, garden-themed items, or whimsical gift lines. I’ve seen sellers use similar designs on printable mockups to test product listings before committing to a full stitch run, and this design’s clean lines make it excellent for that purpose. The layered structure photographs well, catching light and shadow in a way that flat designs sometimes don’t.
Before you list a finished item for sale, though, check the licensing terms. The description mentions the design comes with multiple file formats and can be used with various machines, but it doesn’t specify commercial use rights. As a responsible craft business owner, you need to confirm whether the license allows you to sell items stitched with this design, whether it’s unlimited or restricted, and if you need to credit the designer. This is especially important for digital embroidery file resellers. Never assume the license covers commercial embroidery without reading the included documentation first.
Stitching Tips for a Polished Finish
- Always test the design on a scrap of your final fabric. This isn’t just about tension; it’s about seeing how the layered panels interact with the fabric’s drape.
- If you’re working with dark fabric, run a test with a light thread color outline to see if you need to adjust the contrast. A subtle design can become invisible on a busy print.
- Check the stitch density in your software. The door panels should feel substantial but not bulletproof. Overly dense fills on a lightweight garment can make the fabric ripple.
- Use a topping on any fabric with a nap, like fleece or terry, to prevent stitches from sinking.
- When stitching on a thin fabric, add a layer of lightweight fusible interfacing behind the embroidery area to prevent the design from pulling the fabric out of shape.
- Inspect the small door hinge details under magnification after the first run. If the thread is too thick, you might need to slow the machine speed slightly for those sections.
Who Will Love This Design
If you’re a creative entrepreneur who sells handmade children’s clothing, fairy garden accessories, or personalized home decor, the Layered Fairy Door is a solid addition to your design library. It’s versatile enough to dress up a simple tote bag or become the centerpiece of a pillow cover. It stitches out reliably, offers enough visual interest to justify a higher price point for finished goods, and doesn’t pigeonhole you into a single season or trend.
I also appreciate that it works for both personal projects and small commercial runs, as long as you verify the licensing. The Fairy Tales theme is broad enough to appeal to a wide audience, from new parents decorating a nursery to adults who love a touch of whimsy in their kitchen linens. When I see a design that can shift from a baby embroidery gift to a holiday embroidery stocking accent with just a thread color change, I know it’s a keeper. The Layered Fairy Door earns its place in my stitch library, and I’ll be reaching for it again when the next custom order for a whimsical product comes in.